Showing posts with label Lunch. Show all posts

February 19, 2015

The mushroom debate - Love it or leave it? |~Malai Matar Mushroom~


Mushroom, that one ingredient that evokes as many opinions as does any political debate, is one of my very favorites. I am yet to find any other vegetable (well almost..) that stimulates such strong reactions, that ranges the whole spectrum from total love to utter dislike. No wonder its known as the “meat” of the vegetable world, thereby opening itself up to such strong reactions from the vegetarians. I look at it this way – if something evokes such ardent responses (just like any opinionated person you might encounter), it definitely carries mettle and so it does. Soft yet spongy, chewy yet melt-in-your-mouth - it kindles all sorts of sensations as one bites through that succulent piece of earthiness. 

The "mushroom" love bug caught me quite early and my very first food memory of this powerhouse was when my Dad would come home after an early morning outing to Barabati stadium, where rows of wild mushroom vendors would line up. It was more of a chance that you got hold of them since they would show up only when they had enough mushrooms to sell, which ensured that those were wild rather than cultivated ones. So Dad would be back with the intensely fragrant and flavorful shiitake /brown mushrooms while we would start throwing ideas at my Ma.Till date the wooden, that atypical earthy "mushroom" aroma transports me back to the early morning hustle-bustle in our kitchen. I love every kind – from meaty portabella to the slender enokii mushrooms to the earthy crimini. Each has a distinct flavor, identity and personality that dictates their best fit.

Recently, mushrooms have been making it to my “must-buy” section of our grocery list. From omelets to pastas to- of course my very favorite mushroom masala. I use it with an enthusiasm that can only match my propensity for eggplants. Just like eggplants, what makes them so unique is their ability to soak in new flavors all the while standing strong with their identity. After trying out numerous variations of the mushroom masala, one fine day we craved for the creamy matar mushroom sans the overpowering creamy and bland gravy. Here’s the one that I concocted that has the perfect balance for our palate – melt-in-the-mouth mushrooms with just the right hint of creaminess with a blend of slightly sweet peas. Here you go:

Melt-in-the-mouth mushrooms and sweet peas soak in the smooth tomato gravy with just the precise hint of creaminess from roasted cashews. Serve it with warm chapatis or parathas.

Ingredients:
1 lb Shiitake/Crimini/White button mushrooms
3 Tablespoons Oil
1 inch Cinnamon

1 Large onion chopped
3 Tablespoom Ginger garlic paste
1 Cup Tomato puree
3 teaspoons Chili powder
1 teaspoon Turmeric powder
4-5 Roasted whole Cashews made into a paste
2-3 teaspoons Heavy cream (Optional)
1/4 Cup Green peas

For the dry masala
3 teaspoon Cumin seeds/ Jeera
5 nos. Whole Cloves
2 nos. Whole Cardamom pods

Method:

  1. Slice the mushrooms as thick/thin you like & set aside. 
  2. Add oil to a pan over medium high heat and saute the   onions along with the cinnamon stick till the onions are     lightly golden brown (5-6 mins). 
  3. Then add 3 T of ginger garlic paste and fry over medium heat. Add little water to the paste once it dries out and repeat the process till oil floats on top.
  4. Then add in the tomato puree in small amounts making sure it dries out each time before adding the next batch of tomato puree. The masala should be bright red in color. Note: Choose dark red ripe tomatoes for the best color.
  5. When oil floats on top, add in chilli powder and turmeric powder and stir over medium low heat. 
  6. Then add in the peas and mushrooms and toss well. Saute for 2 mins till mushrooms shrink a bit. Then,add 1/2 C of water and bring it to boil. Add in the cashew paste and heavy cream if using. Simmer over low heat for 15 mins.
  7. In a separate dry pan, add the ingredients for the dry masala (3 tsps of jeera, 5 cloves and 2 cardomom pods). Dry roast till fragrant and grind to a powder.
  8. Sprinkle the dry masala over the gravy just before switching off the heat.

Quick, simple and with the a relatively short grocery list, this mushroom gravy is sure to wow all the mushroom lovers out there. Move over paneer - you have competition :D

Till next time!
J

March 22, 2014

Fresh, light and effortless ~Pudina Murg Masala / Mint Chicken Masala~

How often have you fancied the idea of breaking away from the conventional and just drifting along with the flow? A lot many times? Quite a few times? or Occasionally? 

Whatever your answer may be, you will concur that the heady rush in flowing with your instincts totally trumps the comfort of the known by about hundred thousand times (or well maybe more!!).At some time or the other, we all have been guilty of holding on to the tried and tested in our mundane humdrum of daily routine. But on occasions, when we are presented with the time and opportunity to try something new, I believe we should grab it and hold it as tight as we possibly can.

Well! before I confuse you too much (or lead you into believing that I am nuts!), i will be deft to specify that this is about a new recipe I am talking about that I created in my kitchen while playing around with ingredients.

On one fine day a few weeks back, while ready-ing up the chicken for marination- all I knew in my mind is that I did NOT want to go the usual route (i.e. load it with the spices and masala). I imagined it to be a significantly quick cooking and light dish which can be used both as an appetizer as well as a side dish. An idea struck when my attention was drawn towards the fresh bunch of mint from the farmers market lying on the counter. There in a jiffy, the mint was in the mixer bowl with a bunch of Thai chillies and then right into the marination bowl. With a sprinkling of a very few other spices, the chicken was kept to rest along with its flavorful companions in the refrigerator for about 1-2 days before I took it out again for the main dish.

Without much ado, here’s the recipe for this flavorful, minty chicken gravy that has so fascinated both me and my husband, that I have already made it for the third time in a matter of two weeks!!

                           ~ Pudina Murg Masala / Mint Chicken Masala~


A fresh and light chicken gravy that's distinctly aromatic with mint on a canvas of sweetened onions and tangy tomatoes. A very quick and easy way to bring out the royal flair albeit the effort! 
*Served here with fresh homemade appams.

Recipe:
For marination:
1 bunch Fresh mint
4-5 Thai green chillies (Alter the quantity based on how spicy the chilies are and how spicy you would the dish to be)
1 inch piece Ginger
4-5 Cloves Garlic
1 T  Lemon juice
1/2 tsp Salt

1 lb of Fresh chicken cut into cubes

3 T Oil
1 pinch of Whole spices (2 cloves, 1/2 inch Mace, 1 Cardamom)
2 C Finely sliced Onions
1 C Chopped Tomatoes
1/2 tsp Turmeric powder
1 tsp Red Chili powder
1 1/2  tsp Coriander powder
1 tsp Jaggery/Sugar
Salt to taste

Method:
1. In the bowl of a mixer, add all the ingredients for the marination and make a fine paste. 

2. Toss the chicken pieces with the marinade and keep in the fridge (for ~ 1 hr to 2 days).

3. In a saute pan over medium high heat, pour the oil.

4. Once the oil heats up, add in the whole spices. Wait for the spices to be fragrant.

5. Add in the chopped onions and fry till they are light brown in color (~ 4-5 mins).

6. Then mix in the tomatoes and the spices, cook till the oil separates.

7. Now finally add in the chicken and toss till cooked well (~ 7-8 mins).

This is one recipe you HAVE to make, to understand how flavorful chicken gravy can be without an overdose of spices. It becomes the perfect accompaniment for rice/roti/appams etc. on any given day - if you are in the mood for some playing around. At the end, I was very content that I played with my ingredients and ended up with a recipe I am going to treasure for quite sometime.

So fear not! Go ahead and have fun with your ingredients :)

Love,
J

November 7, 2013

Thinking out-of-the-box with baby eggplants ~ Achari Baingan~


Our Sunday morning visits to the local farmer's market have become a weekly ritual that I really look forward to these days. Heading out to pick veggies for the week, brings about an innate sense of responsibility and satisfaction of going the extra mile to take care of the self. The soothing sight of fresh and vibrant produce complement the hustle and bustle of the accompanying frenzy and bring back pleasant memories of visiting a busy Indian vegetable market (much more cleaner and organized though!). 

If given an option, I would just about buy everything that looks fresh and appetizing. It's really that tempting! But one of the challenges that I often face when I am back home, is to step out of my thinking box and try something new especially when on a time crunch. The biggest criteria being - it has to be appetizing as well as healthy and easy to cook for a regular day to day meal.  Personally, I try to experiment as much as I can by trying out altogether different recipes or on some days shake up things by making small changes in my cooking style (adding jeera as opposed to mustard seeds and so on).

Quite often, some vegetables have such constricted uses that I shudder at the thought of having to make them the regular way. One such veggie is the baby eggplants. I am sure there must be several ways of preparing them, but one dish that distinctly flashes the most is “Bharwa Baigan”. But last Sunday when I picked a dozen of those from the farmer’s market, I mentally swore that I would make anything other than the usual bharva baigan. It's is indeed very delicious, but it is also quite tedious and time consuming. So as I let my imagination play with these glossy baby eggplants, my main aim was to come up with a recipe that was simple to cook in a time crunch along with being excellent in taste.

So here’s the recipe from my experiment with these baby eggplants.

~Achari Baingan~ 


Melt-in-the-mouth baby eggplants and thinly sliced onions seep in the spicy and tangy tomato-yogurt base to make a quick and easy achari (pickle-like) side dish. Perfect for serving up a grand meal at a short notice. 

Ingredients: (Makes 3-4 servings)
12 nos. Baby eggplants
1 tsp turmeric powder
½ tsp salt
½ tsp chilli powder

3 T Mustard oil (You can use any oil for this).
Pinch of asafetida powder (Hing) (Optional)
1 Medium onion Sliced thinly

Mix together the following:
Two medium tomatoes pureed
3 tsp Sambar powder
1 tsp chilli powder
½ tsp turmeric powder
½ tsp sugar
Salt to taste

2 T yogurt
½ tsp garam masala
Chopped cilantro to garnish.

Method:

1. Make two perpendicular cuts in the form of a cross at the base of the eggplants. Sprinkle salt, turmeric powder and chili powder and massage the insides of the eggplants. Keep aside for 10-15 mins.

2. Over medium heat, add 2 T oil into the pan and once its heated, add in the marinated eggplants. Stir fry for about 3-4 minutes till the eggplants are charred slightly on the outside. Remove from the pan and set aside.

3. In the same pan, add 1 T of oil to the remaining oil. Once it’s heated up, add in the hing and sliced onions. Sauté till the onions soften and are pink in color (~ 1-2 mins).

4. Now, mix in the dry masala with the tomato puree and add to the oil. Add ½ C of water and let it boil for about 3-4 minutes till oil floats on the top.

5. Once the oil floats on the top, add in the sautéed eggplants into the masala and sauté till the eggplants are soft.

6. Now add in the yogurt, mix well and sprinkle in the garam masala and cook for 1-2 mins. Garnish with chopped cilantro and serve.

Notes:
1. To quicken the process further, add a little bit of oil to the marinating eggplants and place in the microwave on high for 4 minutes. This softens the eggplants and reduces cooking time on the stove.

2. To make this dish fancier, you can add a tadka of mustard seeds, hing and curry leaves at the end. It adds a touch of sophistication to the dish and yes the extra love too.

3. I use mustard oil to make it typically achari (pickle-like), you can use any oil that you may want.

Having experimented with these charming eggplants, I was immensely satisfied with the result. It was all the more gratifying that I finally chose to do something with these gorgeous eggplants other than the usual Bharwa baigan. Serve it with plain rice and dal or some fancy pulao, this is a must-make vegetarian dish for all us eggplant lovers.

Don't be afraid to play around with the recipe.Have fun experimenting! :)

Love,
J

P.s: I am sending this recipe to:
- "Diwali Bash-2013" hosted by Vardhini from Cook's joy
"Let's Cook with yoghurt" hosted by Nayna

August 26, 2013

The simple Odia classic - "Chingudi Dahi Besara"/ Steamed yogurt and mustard shrimp curry

Before I begin, I must admit that this post is sure going to have a counter for the word “simple” and might even break the records - the only reason being that this recipe is truly-that-SIMPLE. Being an iconic Odia dish, time and again this preparation would accompany a few more curried dishes on our lunch/dinner table but still manage to hold its place impressively well. Fresh shrimp marinated with yogurt-mustard paste and steamed till the shrimp is melt-in-the-mouth tender does indeed sound like a very good proposition. While “good” shrimp and fish curries are relatively easy to find at the restaurants, rarely have I seen this preparation on any of the restaurant menus here at all and that makes me very sad every time.

Time and again my Ma would prepare this shrimp curry and I would be blown away every single time. Honestly I have been craving for this recipe for a long while now and what better opportunity than to learn from the in-home chef a.k.a my Ma when she was visiting me. So it was quite predictable that I would make fervent demands of this mouth- watering shrimp preparation time and again, while my Ma was more than happy to oblige. But as lazy as I got when she was around, I did manage to learn and demonstrate it to her that all these days apart from being a lazy couch potato, I have indeed been a very good student J.

Quite often in simple preparations like this, it’s not the recipe, but the other simple ways and nuances of its preparation that really counts. Fresh cleaned and deveined shrimp forms the perfect canvass for the distinct mustard flavor and the creaminess of the yogurt to come through. The pungency of the mustard paste mellows down during the steaming and blends in with the accompanying condiments. I have had several versions of this preparation but I am sure to be biased when I say that my Ma’s recipe always tastes the best. The mustard paste and the mustard oil add a distinctive punch to this creamy dish tempered with curry leaves and yet again some more mustard seeds. Now without much ado, here’s our home-style creamy and yes very simple “Chingudi dahi besara”.  

"Chingudi Dahi Besara" a.k.a Steamed yogurt and mustard shrimp curry

This classic Odia steamed shrimp preparation combines the creaminess & tartness of the yogurt with distinctly sharp homemade mustard marinade. This melt-in-your-mouth shrimp curry jumps up a notch with the tempering of curry leaves, slivered garlic and of course some more mustard seeds. "Besara" refers to the mustard paste along with the condiments.

Ingredients:
1 lb Cleaned and deveined shrimp
2 T Mustard seeds
1 tsp Cumin seeds/ Jeera
4-5 Cloves of garlic
½ Onion
2-3 Green chillies
3 T Yogurt
2 T Mustard oil
¼ tsp Turmeric powder
Salt to taste
Pinch of sugar.

For the tempering:
½ T mustard oil
½ tsp mustard seeds
2 Cloves Garlic (Slivered)
2-3 Green chillies slit
4-5 Curry leaves

Method:
1. Wash and drain the shrimp and keep aside.
2. Grind the mustard and the cumin to a fine powder.
3. Then add in the garlic, onion and green chillies and make a smooth paste.
4. Pour the paste out in a bowl and mix in the yogurt and the mustard oil along with the washed shrimp.
5. Let it marinate for about an hour.
6. Prepare a steamer. It can be prepared two of the following ways:
i. Pour water in a deep bottomed vessel and place a rack at the top such that the water does not touch the vessel when its kept on the rack. Cover and cook for about 7-8 minutes.
ii. Add water to a pressure cooker then place the vessel containing the fish inside the cooker. Cook for about 1-2 whistles.
7.Temper the prepared dish with a tempering of mustard oil, mustard seeds , green chillies and curry leaves.
8.Boil the curry for 1-2 mins and serve hot with rice.

Try this out and you too can vouch that this dish indeed very simple!!

Until next time,

Love,

J

I am submitting this recipe to:
- "Taste of tropics" hosted by Nandoo's Kitchen and Chef Mirelle.
- "Side dish mela" hosted by Valli
- "Let's Cook with yoghurt" hosted by Nayna

June 19, 2013

A vegetarian's delight - Quick Paneer Biryani


So…here I am back again! 

     After almost three months and several days of incessant thesis writing and dealing with the nitty-gritty of graduate school, I am finally back to my haven – writing and reliving every bite I have loved to make and savor. Almost after every hiatus – laden with feelings of guilt and anxiety, as I sit to start penning down my thoughts, the familiarity of this blog and its comfort, suddenly makes it all seem ok. Back to my very own safe nook, where everything feels the same regardless of how fast things might have changed in the past few months.

     Regardless of all that, this long hiatus from the blog, has been one heck of a remarkable journey through a dream I have always had but never really imagined it happening. Sharing my graduation with my parents and loved ones was one of the most fulfilling experiences even though it remained equally paired with the hustle and the craziness that’s a part and parcel of submitting one’s thesis. While that’s another chapter altogether, for now let's just focus on the better aspects of life – more specifically on the delights of having my Maa here with me, feeding me to my limits and teaching me some handy tricks-of-the-trade. Utter bliss :)

     After months of eating quick-to-make familiar recipes to sail through the rough dissertation-seas, I had the great opportunity of having my Maa here with me to teach me some easy-to-make yet delightfully scrumptious meals in no time. Thankful is the word I am looking for here when I manage to cook up exotic meals in truly minimal time...truly a life saver :)

     To begin with, let’s start with a brief description of this dish. Most aptly described, I would say that it is an ideal hybrid between the royal biryani and a pulao. Pulao in the sense that all its components – such as the paneer and the rice are cooked together in a single pot unlike the biryani, but its flavors and richness match that of its exotic Mughlai cousin. Delete the time consuming part of the biryani process and pair it up with the easy pulao process and here you have a winner. This dish for sure is an absolute keeper for times when you need that one recipe to wow your family or maybe even your guests within no time.

Quick Paneer Biryani

An exotic paneer pilaf made fragrant by the sweetness of lightly fried onions & raisins along with the crunchiness of fried cashews and the aroma of refreshing mint. A delish time saving hybrid between a pulao and a biryani.

Ingredients

For the marination
½ lb Paneer (cut in ½ inch cubes)
¼ tsp turmeric powder
¼ tsp Chilli powder
½ tsp Lemon juice
¼ tsp salt

3 T Oil
½ inch Cinnamon
1 Star anise (Ful chakri)
1 Large whole cardamom (Badi Elaichi)
2 Cloves
4-5 Whole peppercorns
1 Bay leaf

2 tsp Ginger garlic paste
½ tsp Turmeric powder
½ tsp Chilli powder
Salt to taste
Pinch of sugar

1 C Basmati rice (Soaked for atleast 15 mins)

2 C boiling water

1 Large onion (Finely sliced)
1 tsp Raisins
1 tsp Cashews

2-3 T Chopped mint leaves
¼ tsp freshly grated nutmeg and cardamom powder

Optional
1 T Ghee
¼ tsp rose water
Pinch of saffron soaked in warm milk

Method
0. Marinate the paneer with salt, turmeric powder, chilli powder and lemon juice and set aside.

1. Heat up the oil in a vessel over medium heat.Add in the whole spices and stir until fragrant, about 30-60 seconds.

2. Then add in the ginger garlic paste, turmeric powder, chilli powder, salt and sugar to the oil. Stir constantly until the oil floats in the top (~ 3-4 mins).

3. Now mix in the soaked and drained basmati rice into the masala mix along with the marinated paneer cubes. Stir well till everything is coated with the masala (2-3 mins).

4. After the rice is well mixed, add in the boiling water to the pot. Let it then come to a boil and then simmer over low heat for about 10-15 minutes till done. Check in between to test the doneness of the rice.

5. While the rice is cooking, in a separate pan, fry up the sliced onions till light brown. Also sauté the raisins and cashews till fragrant.

6. Once the rice is done, fold in (aka mix lightly) the fried onions, raisins, cashews and mint leaves along with the ghee.

7. Sprinkle the nutmeg and cardamom powder and cover it for at least half an hour and then serve warm with raita or curry of your choice.

8. Optional: After the rice is done, lightly sprinkle some rose water and saffron soaked in milk before covering it up for half an hour.

Another quick variation:
Using a pressure cooker for the rice fastens the process further. Just follow the step 1-3 as given in a pressure cooker. Add the boiling water and then wait for one whistle. Turn off the stove after the first whistle and wait for pressure to release.

Here's hoping that this dish fascinates you to try your hand at it.

Have a great week ahead :)
J

P.S: I am submitting this recipe to:
- "Know your Dairy - Paneer" hosted by Amrita and Jagruti
-  "Kid's delight" hosted by Kalyani and Valli
- "Monsoon temptations" hosted by Manasi
- "Walk through memory lane" hosted by Manju and Gayatri
- "Kid's Delight event" hosted by Jayanthi and Srivalli.
- " Kid friendly dishes" hosted by Vardhini of Cook's joy.

Monsoon Temptations - Food Blog Event

August 26, 2012

"Cheese"-y tricks ~ Marinated & grilled Matar Paneer

Ask any staunch vegetarian about their opinion of paneer and chances are that you might witness them profess their undying admiration for the same.Paneer or fresh cow's milk cheese holds a very special place in the appetite of Indian vegetarians. Need I mention that India is the largest producer of milk in the world? Well..that kind of explains the bias. By now you all might be aware that I am by no chance a vegetarian..and couldn't imagine being one either. So my relationship with paneer has always been more of an obligatory one. Those auspicious days when eating non-veg is a taboo..paneer or chenna is the more obvious and sophisticated choice. Its not that I am a staunch non-vegetarian either but one of my major concerns about any paneer preparation (atleast the ones that I have tasted) has always been that the flavor never penetrates well enough for the whole chunk to taste like the curry. It always seems like a blob of cheese floating in a very flavorful broth without any connection whatsoever. I guess many of you who are not blinded by "paneer- love" will agree with me on this.

So inundated with demands for paneer dishes at my place, I gave in to the pleas. Having reluctantly worked with it many a times following age old recipes, I tried my hand at treating it with more care than required. I promised to treat it with as much if not more respect as I would to any meat. Say meat, and marination becomes synonymous. Even though meat of any kind is marinated to tenderize, impart more zing and make easy the cooking process, my whole and sole reason for marinating paneer was to add more flavor to the paneer chunks so that it melds well into the gravy.

Agreeing on how I want to treat my "cheesy" subject, I marinated it with lemon juice, chili powder, little bit of ginger garlic paste and turmeric powder (how can I forget THAT! hehe). Left it to marinate overnight and grilled the chunks on a hot grill pan to achieve smokiness and of course the eye-appealing rustic grill marks. Trust me..it was SO much better. The flavors of the marinade had percolated into the chunks and each bite tasted so much more appealing to my discerning taste buds. I have been using this trick whenever I have time at hand to marinate (which is not an absolutely essential step but nonetheless vital) and must I say ...I have been converted.

This trick I am sure is bound to please the non-paneer lovers and for ardent paneer fans, this is going to top it. Just try and let me know!


Marinated and grilled Matar Paneer

Marinated and grilled paneer (Indian cottage cheese) cubes soak in the flavors of an aromatic, spiced tomato gravy while pairing perfectly with the mild sweetness of the green peas.  A twist to the popular Matar Paneer, it can easily be made royal by adding in a dollop of fresh cream at the end. Serve it with the Pudina aau matar palau for a complete vegetarian fare. 

Ingredients:
14 oz paneer/400g - Cut into 1 inch cubes.
For marination:
2-3 T Lemon juice
½ tsp Turmeric Powder
½ tsp Chili Powder
½ T Ginger Garlic paste

¼ tsp Salt

3 T Oil
1 inch piece of cinnamon
2 cloves
½ Nutmeg
½ C onion paste
2 T ginger garlic paste

½ C Fresh tomato paste

Make a paste of the following powders in 1 C water:
1 tsp cumin powder
1 tsp coriander powder
½ tsp chili powder
½ tsp kashmiri chili ½ tsp garam masala
¼ tsp Salt

1 C Green peas
Chopped cilantro for garnish (Optional)

Method:


1. Marinate the block of paneer all the ingredients for the marinade. Cover it and keep it overnight in the refrigerator. 
Note: I usually cut the paneer into cubes (1 inch) and marinate them, it leads to better marination.

2. Pour 1 T of oil on a grill pan over medium high heat and grill the paneer pieces (1 - 2 mins ) and keep aside. The pan should sizzle when the paneer is thrown in, that would ensure nice grill marks.


3. Heat oil in a pan over medium heat and add oil. Once the oil is hot, add in the whole spices. Once fragrant (~ 20 secs) add in the onion paste. Stir for about 1-2 mins till dry and then add in the ginger garlic paste and the tomato paste.


4. Stir the above mixture consistently (8-10 mins) so that it does not stick. Add in the paste made of powdered paste 2 T at a time. Let the mixture dry before adding the next 2 T.Continue till the oil separates.

5. Now add 2 C of water to the mixture and simmer till oil floats (~ 5 mins).

6.Then add in the grilled paneer cubes and then after ~ 5 mins add the in the green peas. Simmer for 15-20 mins over low flame.

Taste for salt and other seasonings and serve hot with Pudina aau matar pulau. Opt out of the matar in the rice if it becomes too much of peas in a meal.


This marinating and grilling technique was quite a revelation for me and I have wondered why it has not been done before. Is it lack of time or may be the fact that paneer is so universally loved in any shape and size that no one really bothered to think about it? Hmm..I might keep guessing till I find the answer but in the meantime if you do know the answer then stop by to let me know. Till then..

Enjoy!
J
I am submitting this recipe to:
-"Desi Vidheshi food fest" hosted by Kalyani
- "Cook with spices- Cinnamon" hosted by Revathi and Anu.
- "Celebrate Navratri and Diwali" hosted by Nayna and Jagruti Dhanecha.
- "Simply Sides" hosted by Sumee.

August 22, 2012

Bursts of "garlic-ness" - Roasted garlic fried rice


When renowned chef and culinary writer, Louis Diat said “There are five elements: earth, air, fire, water and garlic”, he echoed my sentiments quite exactly. I couldn’t possibly deny because in my tiny world it does represent the fifth essential life force. I have always been a “add-some-more-garlic please” person (well, who isn’t?). It’s one magical pod of intense flavor that perks many a dull, somber dish. But the hundredth (or maybe thousandth) dimension of this multi-faceted little pod is its very surprising aspect - mild sweetness. Very surprised right?

I couldn’t ever imagine garlic being sweet AT all, before having been to Gilroy of course. In fact, I was quite apprehensive, when I stopped by Gilroy (The garlic capital of the world) to taste some garlic ice-cream. Just out of sheer curiosity, I tasted it. I must agree that I found the concept of garlic ice cream a little too weird but I must mention that the sweetness and intense flavor was something to commend. That kind of convinced me to believe what many say-“Garlic can be sweet and buttery”.

I have always been intrigued by the mild sweetness and the intensification of flavors in the roasted garlic fried rice at one of the popular restaurants. It always made me wonder - How do they manage that? So one fine day while watching my usual line up of cooking shows of Food network, it struck me. That’s how they do it!! Garlic is roasted over medium temperatures over long time till soft, mushy and lightly browned. It does taste amazingly sweet, buttery and yes intensely garlicky! Been quite a revelation. So while deciding the menu for the Indo-Chinese theme party, I had to make the roasted garlic fried rice. It was the obvious choice which went well with the line-up of dishes – Chili chicken and Vegetable Manchurian.

Roasted Garlic Fried Rice


Garlic is roasted slowly over medium low flame till soft, buttery and golden brown to impart this dish with a subtle hint and a boost to the regular Indo-Chinese fried rice. Paired with crunchy veggies and assorted sauces, this simple dish will give enough reason for your guests to ponder about the whereabouts of the mysterious hidden garlicky goodness.

Ingredients:

1 whole garlic + 5-6 pods (Depends on the size of the pods)
1 T oil for roasting

2 C Basmati rice or any long grained rice
½  C Chicken stock or water
¼ tsp salt (Optional)

4 T Sesame chili oil (Use regular oil if unavailable)
½ C Cubed carrots
½ C finely diced green beans
½ C Cubed red bell pepper (I used red bell pepper for its sweetness and color, substitute with any other colored bell pepper if you want)
½ C cubed green bell pepper
1 T finely chopped green chilies
1 T White vinegar (Adjust according to taste)
1 T Tomato sauce
1 T Green Chili sauce
½ C Finely chopped green onions

Method:

1. Roasting the garlic – Peel all the garlic pods and mix it in with 1 T oil, pinch of salt and pepper and place it in the oven at 375oC for about 15-20mins (depending on your oven). Stir after 10 mins and take them out when soft and golden brown. Let it cool. Keep 3-5 cloves aside and make a fine paste of the rest.
Note: This can also be done over the stove. Make sure the pan is over medium low heat and will require frequent stirring for over all roasting.

2. Soak basmati rice for ~15-20 mins. Bring 3 1/2 cups of chicken stock to boil and add in the soaked basmati rice. Stir in 1/4 tsp of salt. Cook till water evaporates and let it cool.

3. Heat oil in a wok. Add in the roasted garlic paste. Stir for 5 secs and add in the veggies as written in order, letting the first veggie to cook for 1-2 mins before adding the next one.
Tip: To reduce cooking time of the veggies on the stove, place them in the microwave for 1-2 mins to steam them a bit. Then toss in the wok over medium-high flame to roast them.Do not overcook else they will lose their color and crunchiness.

4. Once the veggies are cooked (2-3 mins max.), toss in the rice along with the sauces and mix well.Adjust the sauce accordingly. Garnish with green onions finely sliced roasted garlic and serve piping hot with Chili chicken or Vegetable Manchurian.
Tip: You could also serve this with strips of egg omelete and call it a whole meal by itself. Great for kids!

This recipe finally satisfied my curiosity about the intense garlic fried rice served in restaurants and made me a very happy girl. One important note though, when making it for more people, prepare everything in advance but just toss it all in right before serving. This ensures that the rice remains soft yet separate and has the freshly roasted garlic flavor. Now I am glad to have found another recipe for the Indo-Chinese spread of dishes.

Have a great rest of the week folks!
Ciao,
J

I am submitting this recipe to:
- "Show me your hits:Rice" hosted by Sangee and Vardhini.
- Jashn-E-Azaadi hosted by Preeti's Kitchen.
- "30 minute meals" hosted by Srivalli  
"Desi Vidheshi food fest" hosted by Kalyani
- "Bon Vivant-Rice recipes" hosted by Sumee

July 23, 2012

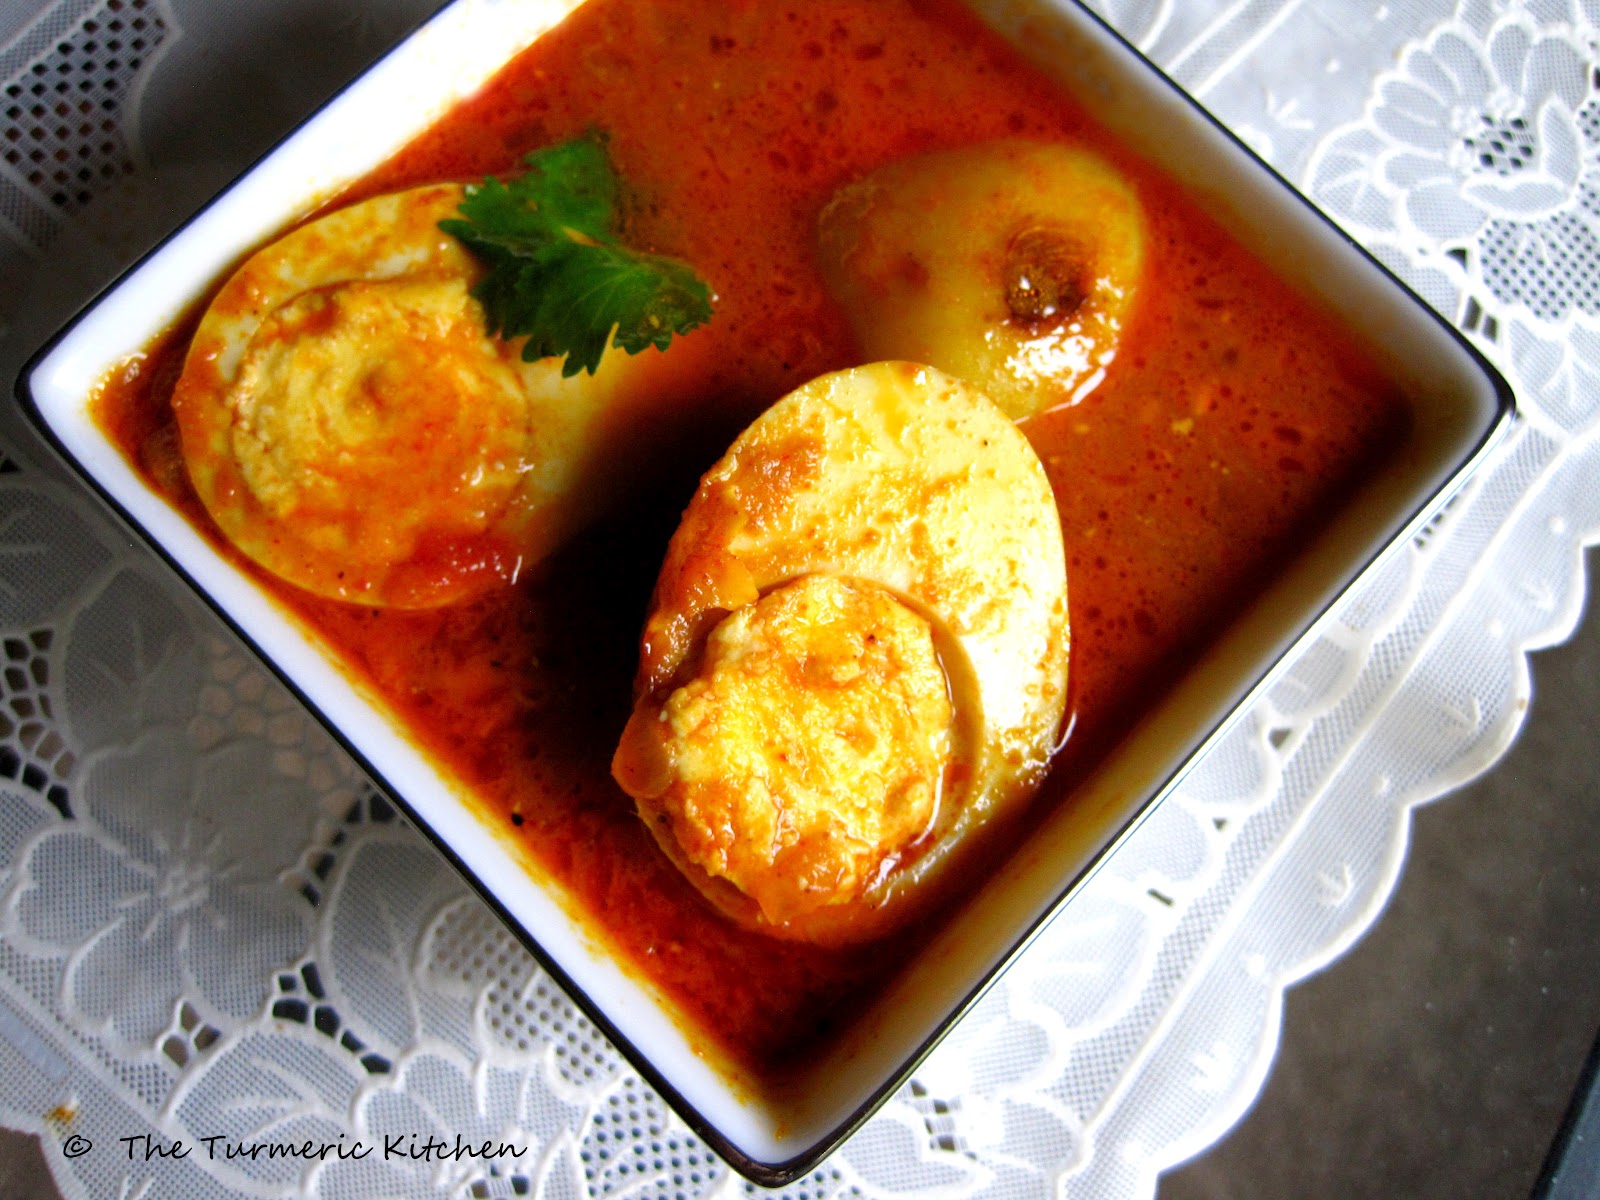
An Odia spin to the classic egg curry - Anda Alu Jhola/Anda Tarkari


How comforting is it to catch a glimpse of eggs gloriously adorning the-almost-empty refrigerator? Very comforting, isn’t it? I say it with much conviction since I believe that I might almost win (or be a very close competitor) for the “The most Experienced” award of such situations - a lot number of times. I might be damned to proclaim it as the most versatile of ingredients EVER but I am sure most of you will agree with me that indeed it is a savior in those critically desperate times.

Eggs are such adorable, "un"-intimidating delights that almost everyone is content savoring and more importantly, very fearless while cooking something wondrous. With its numerous avatars – be it the humble French toast for breakfast, frittata for lunch, nutritious boiled eggs as a snack or the fancy Pasta Carbonara for dinner, eggs are undoubtedly the most pliable of all ingredients I have ever worked with. I actually cannot sing eloquent enough of this dazzling star which is there to support you (as a binder for coating I must add) and of course to provide you with essential minerals and of course the protein for your dear pretty self. Informal, lip smacking and quick meals can be cooked just with eggs. So when in a fix to cook up something elegant, this gorgeous Indian dish with eggs and potatoes is something that pops straight into mind.

Out of all the various renditions of eggs, the one that stands out in memory the most is this simply prepared curry by who else but my Ma. To let you in on some details, with all the various religious restrictions there were only just very specific days of the week on which were allowed to eat/ cook non-vegetarian food back home. Out of all those days, Wednesday was one such day which we eagerly looked forward to as kids. So this “Anda alu jhola” dates back to those Wednesdays when we would rush back from school feeling awfully hungry with all anticipation of what awaits us and reach home to wafts of aroma of this egg curry sipping out through the front door. “Jhola” in Odia refers to a curry with a thinner consistency most usually eaten with rice. The rice soaks up the varied flavors of the jhola which is then coherently boosted with a bite of the seasoned egg. This egg and potato curry was the front runner on days when my darling little brother would insist on eating anything other than fish. My Ma would have hardly any will to resist and we would get to savor this dish. Need I say that he absolutely loves this preparation and yes lil bro, this post is for you.

Anda Alu Jhola

Seasoned and lightly sautéed boiled eggs simmer in a flavorful, thin broth along with sautéed cubed potatoes to add a quintessential Odia spin to the classic egg curry. Usually eaten with rice, this curry is quick to prepare and is a welcome change from heavy, thickened egg gravies.

Ingredients:
3 nos. Eggs 
2 T + 1/2 tsp Oil 
1 1/2 inch Cinnamon stick or 1 Bay leaf (Sprinkle 1/4 tsp cinnamon powder later after the curry is done,if you do not have the cinnamon stick)
1 T ginger garlic paste
2 T onion paste 

For dry spice paste:
1/4 tsp + 1/8 tsp turmeric powder
1/4 tsp + 1/8 tsp chilli powder
1/4 tsp kashmiri chili powder (Optional)
1/2 tsp coriander powder
1/2 tsp cumin powder
1/2 tsp garam masala 
1/2 tsp Amchur/ dry mango powder (Substitute with required amount of lemon juice in its absence)
1 C water 
1/2 tsp salt (Alter as per taste)
Chopped cilantro (Optional)

Method:

1. For perfectly boiled eggs:


The first and the most important step is the boiling the eggs. How often have you ended up with that greyish ring around the yolk or with an egg with runny yolk? So now with this easy process, you are guaranteed to end up with perfectly boiled eggs every time without fail.

Place raw eggs in a pan and fill it with room temperature water till it covers the eggs. Bring the pan to a boil and switch off the stove once the water starts boiling. Cover the pan with a lid for 14 minutes and then, soak the eggs in cold water for about 5 minutes. Peel it once cooled and you have perfectly hard boiled eggs ready to rock.

2. Season the peeled, boiled eggs and cubed potatoes separately with 1/8 tsp of salt, turmeric powder and chili powder.

3. Heat up 2 T oil in a pan over medium heat and toss in the cubed potatoes. Once slightly browned, take those out and then add in the seasoned eggs. Stir and shallow fry the eggs till very lightly browned for 1-2 minutes. Scoop out the eggs and keep aside.

4. In the same oil, toss in the cinnamon stick/bay leaf  and once fragrant, add in the ginger, garlic and onion paste. Stir consistently over medium heat for 1 minute. Then, stir in the dry ingredients for the spice paste in ½ C water and add it to the ginger-garlic-onion paste in the pan. Stir consistently so that the paste does not burn and wait for the mixture to boil. Once the oil floats on top and the masala doesn’t smell anymore of raw onion, you know the gravy is ready. Add in 1 C of water and let it boil.

5. Now slowly slide in the potatoes. Simmer over low heat for about 10 minutes. Right before taking off the heat, add in the halved 
sautéed eggs.Garnish with chopped cilantro, adjust for salt and serve hot with rice or bread.

While I savor this anda alu jhola, I cannot help but travel back in time when all of us would sit together to gobble up the rice soaked in this delectable light gravy. Nothing these days is quite as delightful than that surge of happiness we experienced as we ran back home on a rainy afternoon to this warm and homely preparation.

Hope you enjoyed this trip down memory lane as much as I did:)
Have a great week friends!
J
P.s: I am sending this entry to
- Kalyani and Gayathri for "Walk through memory lane-July 2012"
-"JCO: Monsoon of India" hosted by Sayantani and Jagruti
 - "30 minute meals" hosted by Srivalli 
- "Simply Sides" hosted by Sumee.